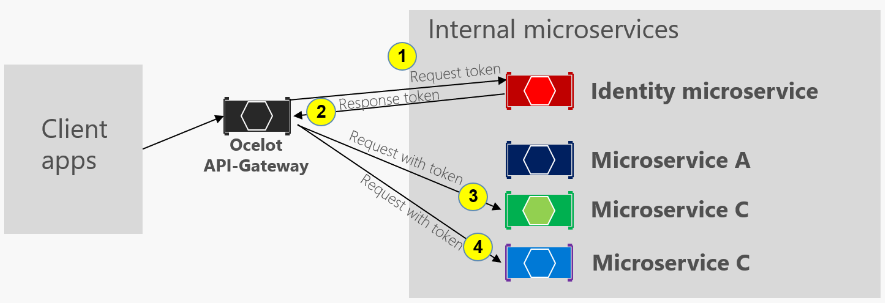
Ocelot Nedir ve .NET Core Projelerinde Nasıl Kullanılır?
Ocelot, .NET Core projeleri için popüler bir açık kaynaklı API Gateway çözümüdür. Mikro servis mimarilerinde yaygın olarak kullanılan Ocelot, servisler arası istek yönlendirme, yük dengeleme, kimlik doğrulama ve yetkilendirme gibi işlemleri yönetmek için kullanılabilir. Bu makalede, Ocelot'un nasıl entegre edileceğini adım adım öğreneceğiz ve Ocelot'un başlıca özelliklerini örneklerle açıklayacağız.
Ocelot'un Başlıca Özellikleri:
- Yük Dengeleme (Load Balancing)
- Kimlik Doğrulama ve Yetkilendirme
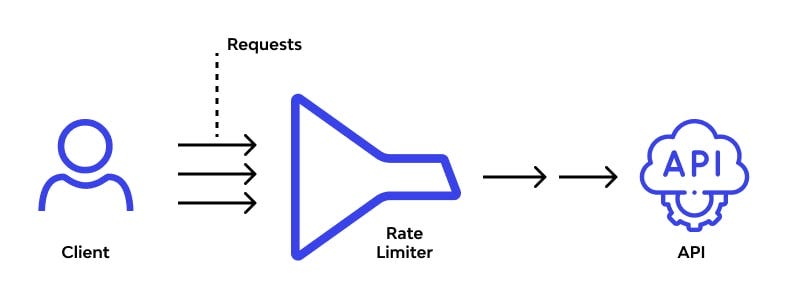
- Rate Limiting
- Caching
1. Adım: Proje Yapısının Hazırlanması
Ocelot ile bir API Gateway oluşturmak için öncelikle proje yapısını oluşturalım ve gerekli bağımlılıkları ekleyelim.
a. Projelerin Oluşturulması
Öncelikle, OcelotApiGateway adında bir proje ve iki mikro servis (OrderService ve ProductService) oluşturun:
dotnet new web -n OcelotApiGateway
dotnet new webapi -n OrderService
dotnet new webapi -n ProductService
b. Ocelot ve JWT Bağımlılıklarının Eklenmesi
OcelotApiGateway projesine Ocelot ve Microsoft.AspNetCore.Authentication.JwtBearer NuGet paketlerini ekleyin:
dotnet add OcelotApiGateway/OcelotApiGateway.csproj package Ocelot
dotnet add OcelotApiGateway/OcelotApiGateway.csproj package Microsoft.AspNetCore.Authentication.JwtBearer
2. Adım: Ocelot Konfigürasyonunun Yapılandırılması
Ocelot, ocelot.json dosyasını kullanarak istek yönlendirmelerini ve diğer yapılandırma ayarlarını belirler. Bu dosyayı OcelotApiGateway projesinin kök dizinine ekleyin ve aşağıdaki gibi yapılandırın:
ocelot.json
{
  "Routes": [
    {
      "DownstreamPathTemplate": "/api/orders",
      "DownstreamScheme": "http",
      "DownstreamHostAndPorts": [
        { "Host": "localhost", "Port": 5001 }
      ],
      "UpstreamPathTemplate": "/orders",
      "UpstreamHttpMethod": [ "Get", "Post" ]
    },
    {
      "DownstreamPathTemplate": "/api/products",
      "DownstreamScheme": "http",
      "DownstreamHostAndPorts": [
        { "Host": "localhost", "Port": 5002 }
      ],
      "UpstreamPathTemplate": "/products",
      "UpstreamHttpMethod": [ "Get", "Post" ]
    }
  ],
  "GlobalConfiguration": {
    "BaseUrl": "http://localhost:5000"
  }
}
3. Adım: Ocelot'u .NET Core Uygulamasına Entegre Etmek
Şimdi, Ocelot'u .NET Core uygulamamıza entegre edeceğiz. Bu adımda, Startup.cs dosyasını güncellememiz gerekiyor.
Startup.cs
OcelotApiGateway projesinin Startup.cs dosyasını aşağıdaki gibi düzenleyin:
using Microsoft.AspNetCore.Authentication.JwtBearer;
using Ocelot.DependencyInjection;
using Ocelot.Middleware;

public class Startup
{
    public IConfiguration Configuration { get; }

    public Startup(IConfiguration configuration)
    {
        Configuration = configuration;
    }

    public void ConfigureServices(IServiceCollection services)
    {
        services.AddOcelot();
        services.AddAuthentication(JwtBearerDefaults.AuthenticationScheme)
            .AddJwtBearer(options =>
            {
                options.Authority = "https://your-auth-server.com";
                options.Audience = "your-api";
            });
    }

    public void Configure(IApplicationBuilder app, IWebHostEnvironment env)
    {
        if (env.IsDevelopment())
        {
            app.UseDeveloperExceptionPage();
        }

        app.UseRouting();
        app.UseAuthentication();
        app.UseAuthorization();
        app.UseOcelot().Wait();
    }
}
4. Adım: Mikro Servislerin Oluşturulması
OrderService ve ProductService için basit birer Controller ekleyelim:
OrderService - Controllers/OrderController.cs
[ApiController]
[Route("api/[controller]")]
public class OrderController : ControllerBase
{
    [HttpGet]
    public IActionResult GetOrders()
    {
        return Ok(new[] { "Order1", "Order2", "Order3" });
    }

    [HttpPost]
    public IActionResult CreateOrder([FromBody] string order)
    {
        return Ok($"Order '{order}' has been created.");
    }
}
ProductService - Controllers/ProductController.cs
[ApiController]
[Route("api/[controller]")]
public class ProductController : ControllerBase
{
    [HttpGet]
    public IActionResult GetProducts()
    {
        return Ok(new[] { "Product1", "Product2", "Product3" });
    }

    [HttpPost]
    public IActionResult CreateProduct([FromBody] string product)
    {
        return Ok($"Product '{product}' has been created.");
    }
}
5. Adım: Ocelot'un Başlıca Özelliklerinin Uygulanması
Yük Dengeleme (Load Balancing)
Ocelot, gelen isteklerin farklı sunuculara yönlendirilmesi ile yükü dengeleyebilir. Örneğin:
{
  "Routes": [
    {
      "DownstreamPathTemplate": "/api/orders",
      "DownstreamScheme": "http",
      "DownstreamHostAndPorts": [
        { "Host": "localhost", "Port": 5001 },
        { "Host": "localhost", "Port": 5003 }
      ],
      "LoadBalancerOptions": {
        "Type": "RoundRobin"
      },
      "UpstreamPathTemplate": "/orders",
      "UpstreamHttpMethod": [ "Get" ]
    }
  ],
  "GlobalConfiguration": {
    "BaseUrl": "http://localhost:5000"
  }
}
Rate Limiting
Rate Limiting ile belirli bir zaman diliminde yapılan istek sayısını sınırlayabilirsiniz:
{
  "Routes": [
    {
      "DownstreamPathTemplate": "/api/products",
      "RateLimitOptions": {
        "EnableRateLimiting": true,
        "Period": "1m",
        "Limit": 5
      }
    }
  ]
}
Caching
Caching özelliği ile istek yanıtlarını belirli bir süre boyunca önbelleğe alabilirsiniz:
{
  "Routes": [
    {
      "DownstreamPathTemplate": "/api/products",
      "FileCacheOptions": {
        "TtlSeconds": 60
      }
    }
  ]
}
Bu makale ile Ocelot'un .NET Core projeleriyle nasıl entegre edileceğini ve başlıca özelliklerinin nasıl kullanılacağını öğrendik. Ocelot, mikro servis mimarilerinde önemli bir rol oynar ve bu özellikler ile güvenli ve ölçeklenebilir bir API Gateway sunar.